

What is the white stuff on my basement walls? In many Massachusetts homes, it is efflorescence: a white, chalky, or crystalline residue left behind after moisture moves through concrete, brick, stone, or mortar and evaporates at the surface.
It looks alarming. That is understandable. Homeowners often first notice it behind storage shelves, near a basement floor-wall joint, on an old fieldstone foundation, or after a long winter and spring thaw. The first thought is usually mold. The second is usually worse: “Is my foundation failing?”
The honest answer sits between those two fears.
Efflorescence is usually not mold. It is also not a verdict on your foundation by itself. It is a clue. The deposit tells you that water, dissolved salts, and evaporation have met somewhere in the wall assembly. The powder may brush off easily. The moisture path that created it may not be so easy to ignore.
This guide explains what efflorescence means, what it does not mean, how to separate a small warning from a serious basement condition, and when a Massachusetts homeowner should get help before insulating, air sealing, or finishing the wall.
What Is the White Stuff on My Basement Walls?
The white powder on basement walls is often efflorescence, a crystalline salt deposit left behind when moisture moves through concrete, brick, stone, or mortar and evaporates at the interior surface. Efflorescence itself is not mold, but it is evidence that moisture has traveled through the masonry. A small, dry, one-time deposit may only need monitoring and an exterior drainage check.
Recurring deposits, seepage after rain or snowmelt, peeling paint, musty odor, visible mold-like growth, deteriorating mortar, damaged wood, or significant cracking require a condition-first assessment. Thermalcore Insulation helps Massachusetts homeowners identify when moisture control needs to happen before insulation, air sealing, or basement finishing.
Efflorescence begins inside the masonry, not on the visible surface.
Concrete, mortar, brick, and stone are not perfectly solid. Moisture can move through pores, joints, and small pathways. As that moisture travels, it can dissolve naturally occurring salts in the masonry or surrounding materials. When the water reaches the interior face of the wall and evaporates, the salts remain behind.
That remaining residue is efflorescence.
Wagner Meters’ explanation of moisture movement through concrete describes how concrete exchanges moisture with external sources and surrounding air. It also explains why condensation can form when a concrete surface is cooler than the dew point of the indoor air. Those two pathways matter in basements: water can move through the wall from outside, or humid indoor air can condense on a cold foundation surface.
Efflorescence is commonly white, but it can be light gray or look crystalline. It often appears as powder, a dust-like bloom, or a thin crust. It is typically found on inorganic surfaces: concrete, brick, block, stone, or mortar.
Mold behaves differently. Mold is biological growth. It often appears fuzzy, spotty, slimy, or stain-like, and it needs moisture plus a suitable food source. Concrete itself is not a food source in the same way paper-faced drywall, wood dust, carpet backing, stored cardboard, or painted surfaces can be. But a damp basement can support both efflorescence on masonry and mold on nearby organic materials.
Efflorescence says moisture has moved through the wall. Mold says moisture has reached a place where biological growth can take hold. Both deserve attention. They are not the same diagnosis.
Why Efflorescence Shows Up in Massachusetts Basements
Massachusetts basements work hard. They face snowmelt, spring rain, humid summer air, cold masonry, freeze-thaw movement, mature landscaping, older drainage details, and in many communities, homes built long before modern foundation-water-control practices became routine.
The white powder may show up after a weather event. It may appear in one corner where downspouts discharge too close to the house. It may return every spring on a wall that looks dry for the rest of the year. It may appear near the floor-wall joint where water pressure and moisture pathways converge.
Building Science Corporation’s groundwater-control guidance identifies two basic principles: keep rainwater away from the foundation perimeter and drain groundwater before it reaches the foundation wall. That is more useful than simply telling a homeowner to “waterproof the basement.”
The aim is to reduce water loading at the wall. Good grade, working gutters, properly directed downspouts, and effective perimeter drainage are not cosmetic details. They are part of the foundation’s moisture-control strategy.
When a basement wall is repeatedly wet, pressure can build against the foundation. Moisture can enter through cracks, joints, porous masonry, or the floor-wall intersection. Efflorescence is one possible visible consequence of that movement.
Efflorescence, Mold, or Something More Serious?
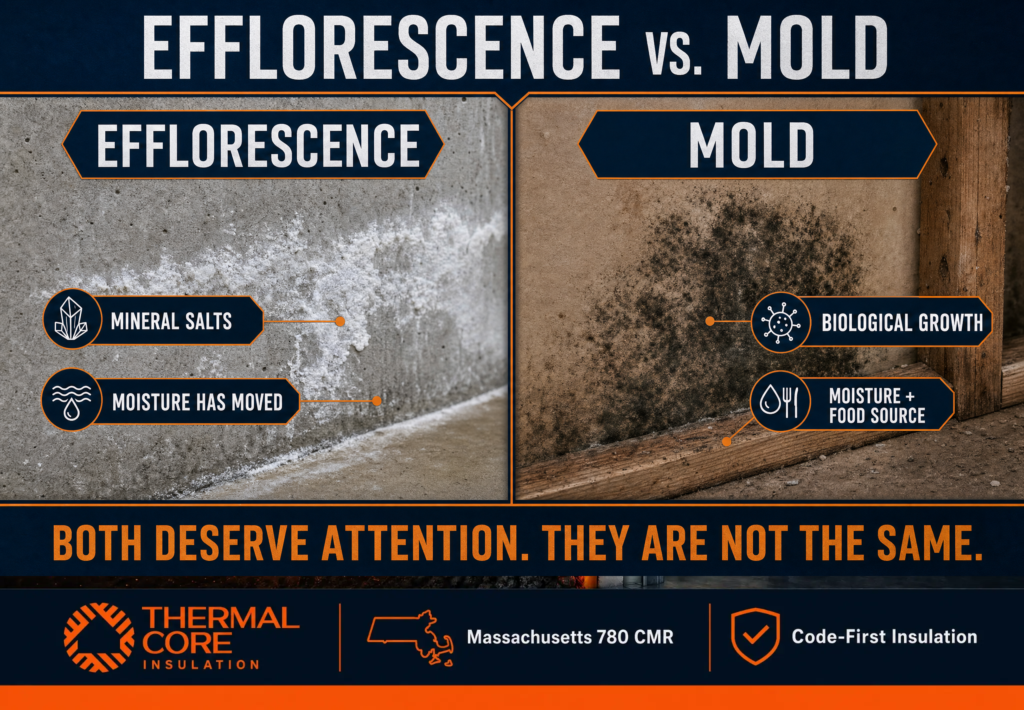
A photograph cannot diagnose every basement. This table helps homeowners separate common patterns before deciding what to do next.
| What you see | Most likely explanation | What it tells you | Best next step |
| Dry, white, powdery or crystalline residue on concrete, brick, stone, or mortar | Efflorescence | Moisture has moved through the masonry at some point | Document the location, dry-brush the surface, and inspect for exterior water sources or recurrence |
| Fuzzy, spotty, slimy, or dark/light growth on drywall, wood, cardboard, carpet, or painted surfaces | Possible mold growth | Moisture and a suitable surface are present | Correct the moisture source and follow appropriate cleanup or remediation guidance |
| White residue that returns after rain or snowmelt | Recurring efflorescence from an active moisture pathway | The water source is likely ongoing, seasonal, or insufficiently controlled | Assess grading, gutters, downspouts, drainage, seepage paths, and foundation conditions |
| Wet floor-wall joint, puddling, or staining with white deposits nearby | Bulk-water entry or pressure-related seepage | The deposit is not the primary problem | Diagnose water management before insulation or finishing work |
| Flaking concrete, crumbling mortar, spalling, or significant cracking alongside recurring moisture | Potential deterioration requiring further evaluation | Moisture may be contributing to material damage | Consult the appropriate foundation, masonry, or structural professional; do not hide it behind a new wall |
| Musty odor, wet wood, soft sill material, or staining behind stored items | Ongoing dampness and possible mold-prone conditions | Moisture is affecting materials beyond masonry | Remove or protect stored materials, identify the source, and address moisture before upgrading the space |
The purpose of the table is not to create panic. It is to stop the opposite problem: treating every white deposit as a cosmetic stain and painting over the only visible evidence of water movement.
When You Do Not Need to Panic About Efflorescence
A small, dry, isolated deposit on an unfinished concrete wall is not automatically an emergency.
If the area is dry, the powder does not return after cleaning, there is no musty odor, no wet floor, no peeling paint, no visible mold-like growth, and no concerning cracking or deterioration, the practical response may be modest. Brush the deposit off dry. Do not soak the wall. Photograph the area and note the date. Check exterior basics: gutter condition, downspout discharge, grade, and whether the area changes after rain or snowmelt.
The word “monitor” is important. A one-time deposit can be a historical trace of a moisture event. A returning deposit is current information.
There is no advantage in pretending that the powder is invisible. There is also no advantage in turning a small, dry clue into a catastrophic story. The homeowner needs a clear way to decide what changes the urgency.
When to Take the White Powder Seriously
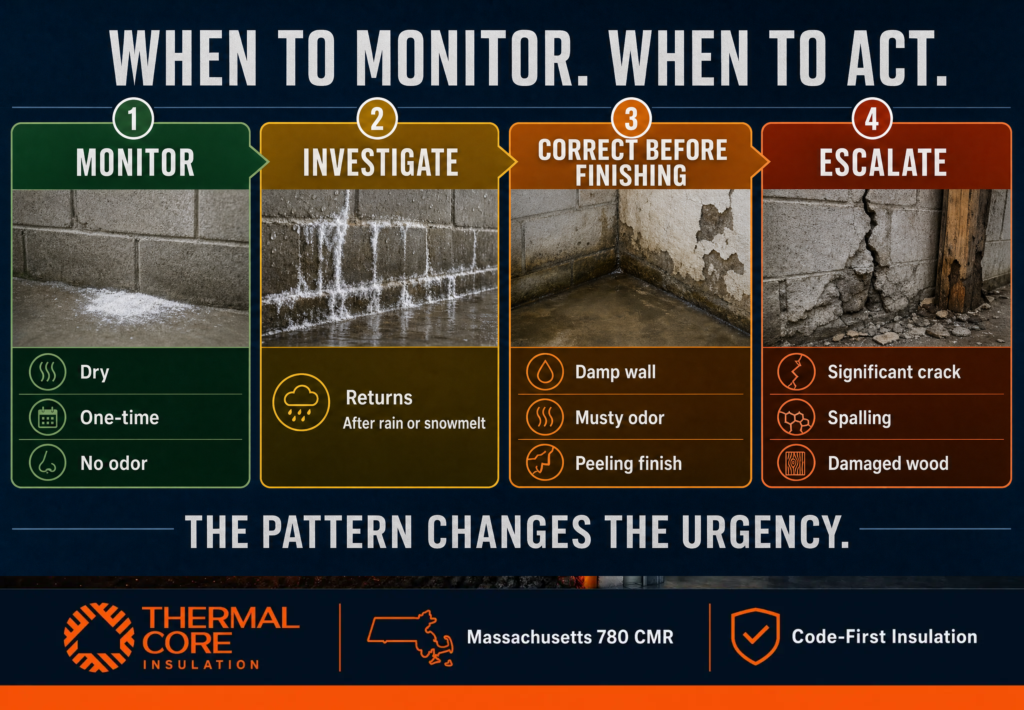
You should move from monitoring to assessment when efflorescence is recurring, spreading, or paired with other signs of water.
The most important trigger is pattern. Does it return after rain? Does it appear after snowmelt? Is it concentrated beneath a downspout or beside a finished wall? Does the floor-wall joint get damp at the same time? Has a previously dry storage area become musty?
The second trigger is material change. Peeling paint, blistering wall finishes, wet or damaged baseboards, soft framing, rotting sill material, crumbling mortar, or spalling concrete mean the condition is affecting more than appearance.
The third trigger is odor and health context. The U.S. Environmental Protection Agency’s mold guidance states that the key to mold control is moisture control. EPA recommends drying water-damaged areas and items within 24 to 48 hours to prevent mold growth. If a basement stays damp or has visible growth on organic materials, the job is not “remove white powder.” The job is correct the moisture problem and then address the affected materials appropriately.
The fourth trigger is structure. A narrow surface crack is not automatically a structural emergency. But significant cracking, horizontal displacement, bowing, recurring leaks through a crack, or visible deterioration of foundation materials deserve prompt attention from the appropriate qualified professional.
| Condition level | Typical pattern | Sensible response |
| Monitor | Small, dry, isolated deposit with no odor, wetness, or recurrence | Clean dry, photograph, observe after weather events, check gutters and grade |
| Investigate | Deposit returns, expands, or appears after rain or snowmelt | Identify exterior water path, inspect drainage and floor-wall joint, document moisture timing |
| Correct before finishing | Wet wall, seepage, recurring dampness, peeling finishes, musty odor, or damaged materials | Address water control and dry the assembly before insulation, framing, or drywall |
| Escalate | Significant cracking, bowing, spalling, damaged sill, sewage-contaminated water, or extensive mold-like growth | Seek the correct foundation, structural, water-control, or remediation expertise promptly |
Do Not Paint, Caulk, or Insulate Over the Clue
It is tempting to solve efflorescence with a paint bucket.
A new coating can make the wall look clean for a while. It does not remove the moisture path. The same applies to caulk used as a general wall treatment, framed walls installed directly against a damp foundation, or insulation added before the basement is dry enough to support it.
The same principle applies to insulation. A cold foundation wall can benefit from the right insulation and air-control strategy. But if water is still reaching the wall, installing foam or framing first may make later diagnosis harder and more expensive.
Building Science Corporation’s basement-insulation guidance recommends a system that keeps the foam layer continuous behind interior framing, recognizes inward drying needs, and avoids interior vapor barriers that can create unwanted moisture conditions in the described assembly. It begins with a dry-basement premise, not a cover-it-up premise.
This is why Thermalcore evaluates moisture before discussing basement insulation or a finished wall. The material does not get to make the diagnosis.
For homeowners who are considering water-control work, Thermalcore’s basement waterproofing cost guide can help frame the scope question. The least costly cosmetic repair can become the most expensive route if it has to be removed to reach the original water problem later.
A Condition-First Checklist for Homeowners
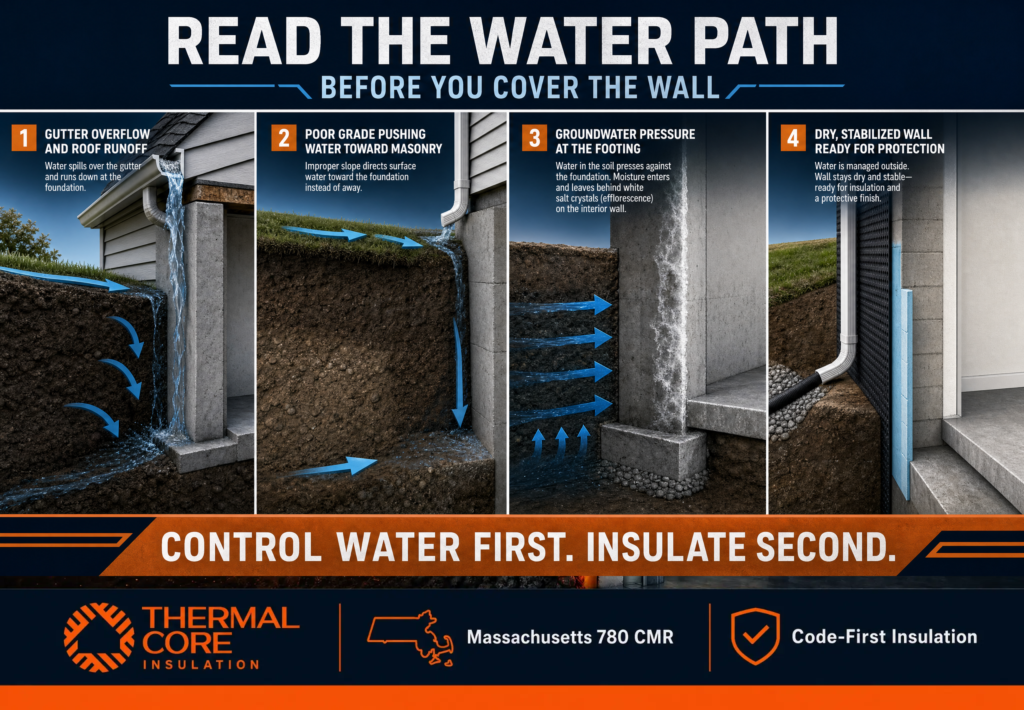
Start outside. Look at the practical water path. Are gutters clear? Are downspouts carrying water away from the foundation? Does the grade fall away from the wall? Does the issue appear on the same wall where exterior water collects?
Then look inside. Note the exact location of the powder. Is it high on the wall, at the floor-wall joint, beneath a window, near a utility penetration, or behind a finished wall? Is it dry or damp? Does it return after a storm? Is there a musty smell? Are stored items or wood framing affected?
Finally, decide what work should wait. If you are planning a basement office, playroom, storage upgrade, insulation improvement, or air-sealing project, resolve active moisture questions first. You can learn more about the role of air control in an enclosure through Thermalcore’s guide to commercial buildings and air sealing. The building-science principle applies across building types: uncontrolled air and water movement can undermine an otherwise good insulation plan.
A dry, stable basement can support a better Thermalcore Fire-Safe Envelope, appropriate insulation, and code-aware protection. A damp basement needs its water story understood first.
Thermalcore Approach
Thermalcore Insulation helps Massachusetts homeowners make a practical distinction between a minor visible clue and a moisture condition that can undermine a renovation.
Our approach is straightforward. We look at the condition of the basement, the likely water and air paths, the readiness of the wall for insulation, and the code-aware details that belong in the final assembly. When foam insulation and protection are appropriate, we build the scope around Code-First Insulation and the applicable Dual-Defense Intumescent Shield strategy rather than treating fire protection as an afterthought.
Efflorescence does not always mean a large project. It does mean the wall has a message. The goal is to read it before a new finish hides it.
If white powder keeps coming back, the basement smells musty, the wall is damp after storms, or you are planning to insulate or finish the space, contact Thermalcore Insulation for a condition-first conversation.